Interview with SEO Hobby Expert, a Green-Thumb Plant Parent: Repotting a Massive Bird of Paradise
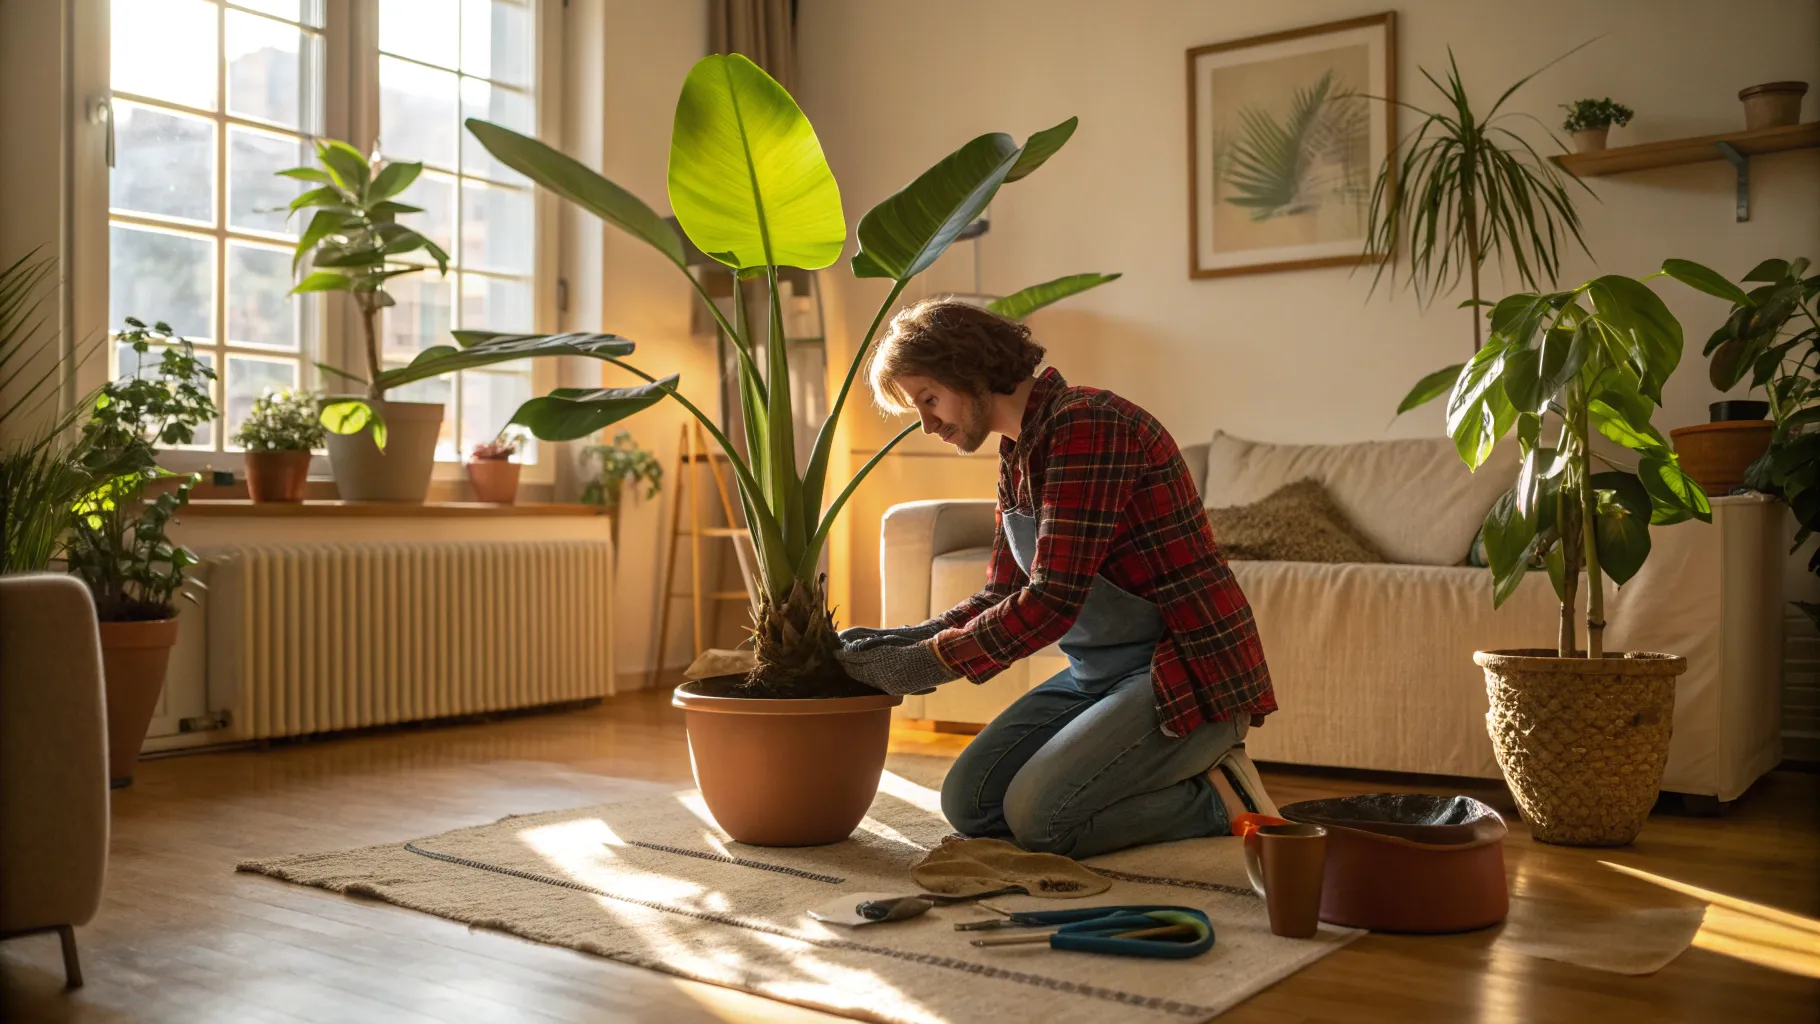
Table of Contents
- Introduction
- Background and Context
- Why Repot Now?
- Preparing for the Move
- The Extraction: Practicalities and Emotions
- Root Work and Rehoming
- Pot Selection, Placement, and Support
- Aftercare: The Critical Recovery Phase
- Practical Tips, Common Mistakes, and Final Reflections
- Practical Step-by-Step Summary
- Personal Notes and Anecdotes
- Where to Learn More and Credits
- FAQ
- Closing Thoughts
- Additional Resources
Introduction
Can you introduce yourself and tell readers why this repotting story matters to the many green enthusiasts out there?
I'm SEO Hobby Expert, the face behind the channel Plants with SEO Hobby Expert, a self-described plant parent who has spent years cultivating a small indoor jungle and learning—often the hard way—how to keep large tropicals happy in a non-tropical, often-dry climate. This repotting story matters because it captures a fairly common crossroads for enthusiastic green collectors: when a beloved specimen outgrows its home and you must wrestle with the practical and emotional work of moving it into a new pot. The video documents repotting a massive Bird of Paradise that I propagated last spring and that has since become too big for its container. For many green-thumbed readers, this is not just a how-to; it's a window into the real-life anxieties, decisions, and small triumphs that come with caring for tall, dramatic plants inside a living space.
Why choose a Bird of Paradise for such an in-depth repotting walkthrough?
Bird of Paradise (Strelitzia spp.) are dramatic, architectural plants that reward patience and good care with bold leaves and, in some climates, spectacular flowers. They are a favorite for people who want a statement plant that brings a sense of the tropics indoors. I chose to share this repotting because these plants present practical challenges—heavy rhizomes, dense root systems, and, when propagated, a recovery process that can look alarming before things improve. For anyone who keeps green plants, seeing the process demystified helps normalize the shock phase and teaches practical techniques for handling big root-bound specimens safely.
Background and Context
You mentioned this Bird of Paradise was propagated and was originally part of one mother plant—can you walk us through that story?
Last spring, I faced a difficult decision: the original Bird of Paradise, the mother plant that contained three distinct crowns, became too stressed. To save the plant and to manage its size, I propagated it by physically dividing the root mass into three separate plants. This is not a gentle propagation method; it requires removing the plant from its pot and literally cutting or carving the root ball into sections. It's effective, but it sends plants into an obvious period of shock. For the first month to month-and-a-half after I separated them, the new partitions looked like they were failing. That's the ugly and anxiety-inducing part of division: they look like they're dying. Then they began to re-root and eventually thrive. The plant I repotted in the video is one of those propagated offspring, and it grew so fast that it was literally top-heavy and beginning to tip its pot.
How long have you had this particular Bird of Paradise and what is your personal attachment to it?
I've had this specific Bird of Paradise for about three years—long before the pandemic. Over that time it grew from a small, vulnerable specimen into a commanding presence in my living space. Many plant parents will recognize the sentimental attachment: we grow with our plants. They mark seasons, moves, and small moments of personal growth. This plant represents a couple of years of care, experimentation, and patience. That makes the act of taking it out of its pot feel a little like taking apart a stable family. Add to that the anxiety of potentially breaking a leaf or stem while trying to free a root-bound monster, and you've got the emotional stakes of this repot.
Why Repot Now?
What cues told you it was time to repot despite it being winter and you preferring to avoid repotting during low-growth months?
Usually I avoid repotting in the winter because plants grow less and are less resilient to disruption. However, several clear cues told me it couldn't wait. The Bird of Paradise was pushing out a new stem and leaf—signs it wanted to grow—and then it stalled because the pot no longer provided the space or soil structure for continued expansion. The plant had become top-heavy and had already tipped over once, which is never a good sign. I had also propped it up with a stone and bamboo canes just to buy time. When a plant starts changing growth behavior—making new leaves then stopping—you have to read that as a limit signal. Waiting risked stress-related damage, broken leaves, and more dangerous tipping incidents. So despite my preference to repot in spring, the conditions necessitated action.
How did the potting situation compare to your previous repotting experience with the same species?
Interestingly, earlier I had to break a pot open with a hammer because a Bird of Paradise had grown so root-bound that the roots had fused with the pot to the point of immovability. That memory added to my dread for this repot. In this case I hoped a careful knife around the pot edge and some wiggling would be enough. The roots were indeed dense and wrapped around the soil, but I was able to extract the plant without resorting to a hammer. I still had to loosen and tease apart the roots—the same root-bound issues presented themselves, but the extraction was ultimately successful without destructive methods.
Preparing for the Move
What preparations did you make before starting the repotting process?
Preparation is half the battle when moving a large plant. I did several things ahead of time: I cleared a work area, placed a trash bag to catch soil (though indoors hardwood floors meant some mess was unavoidable), selected a larger new pot, and pre-filled it with a fresh soil mix. I also grabbed tools: a large kitchen knife to loosen the root ball from the pot and an extra hand (in my head) because you never know when you’ll need help with a tall, heavy green plant. I also kept a broom, slippers, and a pot of soil within reach. Emotionally, I braced myself for the mess and the sweat—both unavoidable when repotting something this size.
What was in your fresh soil mix, and why did you choose it?
I used a blended, well-draining mix with a few key ingredients: perlite for aeration, worm castings for gentle nutrient release, and a cactus-succulent base for drainage. Bird of Paradise plants like to drink but not sit in soggy soil, so a lighter mix with good drainage encourages healthy root movement without waterlogging. The mix gives roots space to grow, retains some moisture, and supports microbial life—all important for helping a plant recover quickly after the stress of being moved. I aimed for a balance: nutrient-rich but airy and free-draining—an approach I've found successful for large tropicals in drier climates.
The Extraction: Practicalities and Emotions
Describe the moment you decided to pull the plant out. Was it as stressful as it looked on camera?
Pulling the Bird of Paradise out of its pot was a mix of adrenaline, sweaty effort, and a little sadness. It felt like plant childbirth—monumental, messy, and worth it. I used the knife to separate soil from the pot edges, wiggled the pot, and used my feet to brace it as I leaned and tugged. At one point, I had to accept that it would make a mess on my hardwood floor and that I'd be cleaning soil off myself for a while. There was a moment of real relief when the pot finally released and the root mass came into view, clinging with dense roots and compacted soil. The plant is tall—over six feet in total, while I'm five foot six—so the sheer size amplified the difficulty. Emotionally, I felt exhausted but proud: hard work, careful technique, and patience paid off.
Did you damage any foliage or stems during the extraction?
Thankfully, no major foliage was lost during this repotting. The plant had previously lost a leaf when it tipped over one morning, but this time I managed to keep all stems and leaves intact. The trick is to be sensitive and patient: don't force it, coax the root ball slowly out, and give roots a chance to separate from the pot. For those who worry about accidental damage, the reality is that sometimes a leaf might snap. When it happens, it's not the end of the world. Plants are resilient, and proper aftercare will help them recover.
Root Work and Rehoming
What did you do with the roots once the plant was out of the pot?
Once out, I carefully shook some of the excess old soil and teased the large, compacted roots to help them spread into the new medium. I loosened the root ball in several places to encourage new root growth outward into the fresh soil. If roots are left tightly coiled, they tend to remain root-bound and can circle the pot, eventually strangling themselves or staying confined. Teasing and loosening help the roots anchor into the new soil and reduce the likelihood of future root circling. I also checked for any obviously rotten or mushy roots and removed them gently. After that, I dipped some of the larger roots and root base in a rooting hormone to encourage quicker re-establishment.
You used rooting hormone—why, and where did you apply it?
Rooting hormone helps stimulate root growth at severed or disturbed areas of the root system. Even if you're not cutting roots, the act of removing and teasing the root ball is a disturbance that benefits from hormonal support. I dipped thicker root sections and the root crown lightly into the rooting hormone to give the plant a boost in reestablishing its root network in the new soil. It's not strictly necessary—many plants will recover without it—but in stressful interventions like dividing or repotting a large specimen, it can reduce recovery time and support healthier root initiation.
Pot Selection, Placement, and Support
How did you choose the new pot and how much larger should it be than the old one?
I opted for a pot slightly larger than the old one. Bigger pots give room for the root mass to expand, but there's a danger in choosing one that's excessively large: too much soil retains excessive moisture, increasing the risk of root rot. For this Bird of Paradise, a modest increase in diameter and depth was the aim—enough to free the roots and give them space to grow without creating a soggy oversized reservoir. The new pot also has to be sturdy enough to bear the top-heavy plant. Sometimes for very tall specimens, it's better to increase pot size gradually rather than in a single, huge jump.
What did you do to stabilize the top-heavy plant in its new home?
Support is crucial for a tall specimen like this one. Before repotting, I had propped the plant with a stone and bamboo poles. In the process of moving it to its new pot, I kept the option of continued structural support open—whether that be bamboo stakes, a stiff cane, or a decorative stone to counterbalance the weight. Temporarily supporting the crown while roots re-establish prevents tipping and protects new emerging leaves. Over time, as roots fill the new pot and the plant anchors, the supports can be removed. For now, I left the option of adding another cane or stake and made sure the root ball was seated snugly in the soil to minimize wobbling.
Aftercare: The Critical Recovery Phase
What immediate aftercare did you provide once the plant was back in its pot?
Aftercare focuses on minimizing stress while encouraging the plant to re-root. I filled the pot around the teased roots with my fresh soil mix, firmed it lightly to remove air pockets (but not so much as to compact it), and ensured the crown was at the correct height. I watered lightly to settle the soil—Bird of Paradise like moisture but not saturation. I used the watering as a settling method rather than to drench the soil deeply. For the next few weeks, I monitored humidity, light, and avoided fertilizing aggressively to prevent forcing top growth before the roots were ready. Light was balanced: bright but indirect, avoiding scorching sun while ensuring enough light to prevent etiolation. I also kept a careful eye on new leaf emergence as the best signal of recovery.
How long should owners expect a plant like this to be in shock, and what signs indicate recovery?
The shock phase varies. For the plants I divided last spring, the first month to month-and-a-half looked rough, then plants rebounded. For a repot, especially in winter, expect a slower recovery: anywhere from several weeks to a few months. Signs of recovery include the initiation of new roots (not always visible without repotting) and above-ground signs like new leaf shoots, healthy turgor (leaves not droopy), and stabilization of existing foliage. Avoid overreacting to temporary leaf yellowing or minor droop—this can be a natural response as the plant reallocates energy to root repair. Patience is key; steady, gentle care will win out.
Practical Tips, Common Mistakes, and Final Reflections
What common mistakes do people make when repotting large green plants?
Several common mistakes recur:
- Choosing an excessively large new pot that retains too much water, leading to root rot.
- Forcing the root ball out quickly without loosening edges first, resulting in torn roots or broken stems.
- Failing to provide temporary support for top-heavy plants, increasing the likelihood of tipping and damage.
- Overwatering immediately after repotting; the plant needs moisture, but not a saturated environment while roots are re-establishing.
- Repotting in low-light, low-growth seasons without necessity—if it can wait to spring, it often should.
Avoid these pitfalls by choosing a modestly larger pot, loosening root coils gently, supporting the crown, watering judiciously, and repotting only when necessary or when the plant shows clear cues like halted growth or tipping.
What surprised you during this experience?
Even though I feared this would be worse than it was, the density of the roots and the compactness of the soil surprised me. The effort it took to extract a six-foot-plus plant inside a living room was also a humbling reminder of how much tension exists between keeping indoor plants as design elements and managing them as living organisms with needs. I also was reminded that sometimes the messy, sweaty work of repotting is part of plant parenthood: soil on hardwood floors, a second shower, and then the relief of seeing the plant settled. The sentimental piece—the portrait stone I removed from the pot—was a small reminder that these plants sit at the intersection of our lives and our living spaces.
Are you planning to repot again soon?
Given how quickly this plant had expanded, it's possible I may need to repot again within a few months—ideally not until spring. My goal is to give it sufficient time to re-root in the new soil and stabilize before considering another pot increase. If the plant resumes steady new growth and roots settle in, I will wait until spring to do any major changes. But part of plant care is adapting to realities: if a plant's growth habit forces your hand, a mid-season repot can be necessary. For now, it's settle-and-monitor: support, steady light, careful watering, and patience.
Practical Step-by-Step Summary
Can you summarize the repotting process into a concise step-by-step guide for green plant owners?
Absolutely. Below is a distilled step-by-step that mirrors what I did and that I would recommend for similar large tropicals:
- Prepare your workspace: clear space, lay down a tarp or trash bag, have tools and new pot ready.
- Choose the right pot: modestly larger, sturdy, with good drainage.
- Mix fresh, free-draining soil: include perlite, worm castings, and a succulent/cactus base for aeration.
- Loosen the root ball: use a knife to gently separate soil from the pot rim and wiggle the root mass free.
- Inspect roots: remove obvious rot, tease out coils so roots can grow outward.
- Optionally apply rooting hormone to disrupted roots to encourage re-establishment.
- Seat the plant in the new pot, fill with soil, and firm gently to remove air pockets without compacting.
- Provide temporary support: stakes, canes, or counterbalance stones for top-heavy plants.
- Water lightly to settle soil; avoid heavy soak immediately after repotting.
- Place in bright, indirect light, monitor moisture and humidity, and avoid fertilizing heavily for several weeks.
Personal Notes and Anecdotes
Any personal or sentimental stories tied to this plant and the repotting day?
Yes—this plant has been with me through years and had a small bit of history attached to the pot: a stone that bears a portrait of my family home from upstate New York, where my mother lives. Removing that stone felt like moving a keepsake out of the plant's base, a reminder of why we keep these green companions in our homes. Also, the comedic side of the story is that I had hoped to do the job with a friend, but the holidays made schedules tight. Doing it solo was more physically and emotionally demanding, but a reminder that sometimes our green projects are solitary acts of care that connect us to other people and places indirectly.
What did you learn about yourself as a plant parent from this experience?
I learned that delaying necessary work—usually out of anxiety or perfectionism—only compounds the problem. The plant got to a tipping point that made repotting urgent. Facing the mess, admitting vulnerability (I wished for help), and taking the plunge taught me resilience. I also was reminded that being a good plant parent is less about being perfect and more about consistent, thoughtful interventions: the right soil, timely action, and a willingness to clean up after yourself. The process also reaffirmed that plants are forgiving; with the right aftercare, they will often bounce back better than you expect.
Where to Learn More and Credits
How can readers follow your work or find the original video?
You can find the full video documenting this repotting on my YouTube channel Plants with SEO Hobby Expert. The video walks viewers through many of the moments described here: the anxiety, the practical tools, the messy floor, and the eventual relief of success. Watching the footage is helpful because it shows scale, body positioning, and real-time decisions that are harder to convey in text alone. If you appreciate green content and step-by-step plant care, subscribing and engaging with the video supports the creation of more detailed tutorials and plant stories.
FAQ
Is repotting a Bird of Paradise different from repotting other large houseplants?
Yes and no. Many principles are shared—choose a slightly larger pot, provide fresh soil, avoid overwatering, and support the plant. What differs is how robust and dense Bird of Paradise root systems are. Their rhizomes and thick roots become strongly compacted and can require more elbow grease to tease apart. Additionally, because the plant can be tall and top-heavy, you must prioritize stability and structural support during and after repotting more than you might with more flexible, less rigid species.
How do I know if my green plant is root-bound and needs repotting?
Common signs include roots growing out of drainage holes, soil that dries out rapidly because roots occupy most of the volume, new growth that stalls despite apparent healthy care, or the plant tipping easily. Additionally, when you gently tip a plant out of its pot, if the root ball is a tight, solid mass with roots circling, it's a clear sign. These are signals that more space will support healthier growth.
Should I always use rooting hormone when repotting or dividing?
Rooting hormone is helpful but not mandatory. For divisions or situations where roots have been cut, rooting hormone can speed root formation and reduce recovery time. If you're simply repotting without extensive root disturbance, it’s often unnecessary. For large, stressful interventions on a valued green specimen, many plant parents choose to use it as a precautionary boost.
Can I repot during the winter if necessary?
Yes, but proceed with care. Winter is a lower-growth time, and plants are less resilient. If you can wait until spring, you generally should. However, if a plant is tipping, root-bound to the point of risk, or showing halted growth that suggests it will do better with more space now, repotting in winter is justifiable. When you do repot in winter, provide gentler aftercare—light management, careful watering, and avoiding heavy fertilization until signs of resumed active growth appear.
How often should a Bird of Paradise be repotted?
It depends on growth rate and pot size. Young, fast-growing plants might be repotted every 12–18 months, particularly if they're in small nursery pots. Mature plants in stable, roomy containers may only need repotting every 2–3 years. Watch for the cues mentioned earlier: roots outgrowing the pot, stalling new growth, tipping, or soil that no longer supports healthy moisture balance. For my Bird of Paradise, rapid growth and propagation meant it needed a more frequent check-in and earlier repotting than a more conservative timeline would suggest.
Any tips on dealing with the inevitable mess after repotting?
Yes—accept some level of mess as part of the process and plan accordingly. Protect floors with tarps or drop cloths, have a broom and dustpan ready, and keep wet wipes or a damp cloth nearby for quick cleanup on skin and surfaces. Hardwood floors are easier than carpet, but you'll have to re-sweep. A second shower is often part of the reality for larger repots. Thinking ahead reduces anxiety and speeds the cleanup, which in turn helps you restore order and enjoy the newly repotted green addition.
Should I fertilize after repotting?
Wait. After repotting, especially if you've used fresh soil with nutrient-rich components like worm castings, do not fertilize aggressively. Give the roots time to re-establish for a few weeks to a couple of months before resuming routine fertilization. When you do resume, start gently. Pushing top growth too soon can stress the plant if the root system cannot support it.
Closing Thoughts
Any final reflections on the relationship between plant care and patience?
Plant care is a lesson in patience, humility, and adaptability. This repotting experience reinforced those truths. Green plants teach us to observe, act when necessary, and accept that some interventions are messy but ultimately life-giving. Plants forgive, adapt, and grow in response to thoughtful care. If you're about to repot a large specimen, prepare well, be gentle, and allow the plant time to heal. The rewards—a healthier, more stable, and surprisingly resilient green companion—are worth the trouble.
Where can readers go for more guidance or to watch the original video?
For a visual companion to this article, watch the full repotting video on the Plants with SEO Hobby Expert YouTube channel. Subscribing and liking the video helps create more content like this, and the video shows scale and technique in a way written text cannot fully capture. If you have specific questions after watching, comment on the video or reach out via the channel—community conversations help all of us become better plant parents.
Additional Resources
Do you recommend any resources for people who want to dive deeper into caring for large tropical houseplants?
Yes. Look for plant care guides focused on Strelitzia and large tropical, consult local greenhouse experts for region-specific advice (particularly about winter care and humidity for drier climates), and join online plant communities where growers share repotting photos and timelines. Practical books on indoor plant care, horticultural forums, and tutorial videos (including the Plants with SEO Hobby Expert channel) can provide both the theoretical background and the visual confidence needed to undertake large repotting projects.
Comments
Post a Comment